SLO Validation with Auto GH Actions Trigger
Validate SLOs and automatically trigger a GitHub Actions workflow
Problem: You have a Kubernetes app. You want to verify that it satisfies latency and error rate SLOs and automatically trigger a GitHub Actions workflow based on the result.
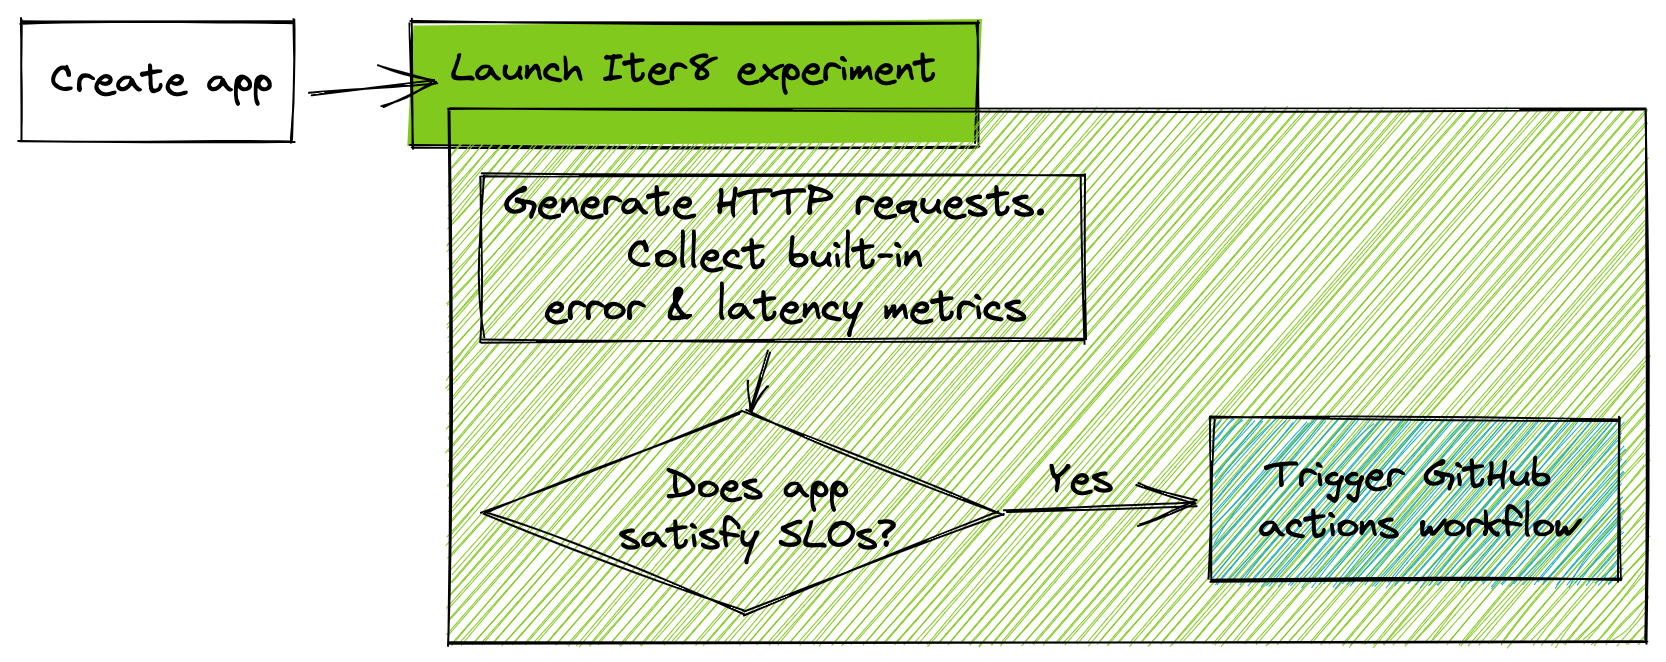
Solution: In this tutorial, you will launch a Kubernetes app along with an Iter8 experiment. Iter8 will validate that the app satisfies latency and error-based objectives (SLOs) using built-in metrics. During this validation, Iter8 will generate HTTP GET requests for the app. Once Iter8 verifies that the app satisfies SLOs, it will automatically trigger a GitHub Actions workflow.
Setup Kubernetes cluster and local environment
- If you completed the Iter8 getting-started tutorial (highly recommended), you may skip the remaining steps of setup.
- Setup K8s cluster
- Install Iter8 in K8s cluster
- Get Helm 3.4+.
- Get
iter8ctl - Fork the Iter8 GitHub repo. Clone your fork, and set the
ITER8environment variable as follows.export USERNAME=<your GitHub username>git clone git@github.com:$USERNAME/iter8.git cd iter8 export ITER8=$(pwd)
1. Create app
The hello world app consists of a Kubernetes deployment and service. Deploy the app as follows.
kubectl apply -n default -f $ITER8/samples/deployments/app/deploy.yaml
kubectl apply -n default -f $ITER8/samples/deployments/app/service.yaml
2. Enable GitOps
3.1) Create a personal access token on GitHub. In Step 8 of this process, grant repo, workflow and read:org permissions to this token. This will ensure that the token can be used by Iter8 to trigger GitHub Actions workflows.
3.2) Create K8s secret
# GHTOKEN environment variable contains the GitHub token created above
kubectl create secret generic ghtoken --from-literal=token=$GHTOKEN
3. Launch Iter8 experiment
Deploy an Iter8 experiment for SLO validation followed by a notification that triggers a GitHub Actions workflow.
# USERNAME environment variable contains your GitHub username
helm upgrade my-exp $ITER8/samples/slo-ghaction \
  --set URL='http://hello.default.svc.cluster.local:8080' \
  --set limitMeanLatency=50.0 \
  --set limitErrorRate=0.0 \
  --set limit95thPercentileLatency=100.0 \
  --set owner=$USERNAME \
  --set repo=iter8 \
  --set ref=master \
  --set workflow=demo.yaml \
  --install
The above command creates an Iter8 experiment that generates requests, collects latency and error rate metrics for the candidate version of the app, and verifies that the candidate satisfies mean latency (50 msec), error rate (0.0), 95th percentile tail latency (100 msec) SLOs.
Once Iter8 verifies that the app satisfies SLOs, it will trigger the demo.yaml workflow in the iter8 repo. It uses the ghtoken secret to do this.
View the manifest created by the Helm command, the default values used by the Helm chart, and the actual values used by the Helm release by following the instructions in this step.
4. Observe experiment
Observe the experiment by following these steps.Once the experiment completes, visit https://github.com/$USERNAME/iter8/actions to view your workflow run.
5. Cleanup
helm uninstall -n default my-exp
kubectl delete -n default -f $ITER8/samples/deployments/app/service.yaml
kubectl delete -n default -f $ITER8/samples/deployments/app/deploy.yaml
Reuse with your app
Reuse the above experiment with your app by replacing the hello app with your app, and modifying the Helm values appropriately.